
.png)
Modern analytics teams want fast queries, scalable architecture, and a pipeline they can trust in production. ClickHouse delivers all of that but only when your migration strategy is built cleanly, end-to-end.
This article walks you through exactly how to migrate from any source system into ClickHouse Cloud, using 100% verified patterns. No shortcuts. No missing steps. No interpretation changes.
You’ll also see a full practical implementation using:
- clickhouse-local for data ingestion
- dbt-clickhouse for data modeling
- Databrain for data analytics, data visualization, and embedding
By the end, you’ll have a scalable, automated, production-ready pipeline that runs automatically and scales effortlessly.
Understanding the Migration Landscape
Before you migrate a single row, you need to confront the most important question:
Where is your data coming from?
Speed, cost, reliability, long-term maintenance burden depends on this first step.
Identify Your Data Source
Your data will typically fall into one of four buckets:
- Relational databases
- Data warehouses
- Cloud object storage
- Streaming systems
This single step determines which ingestion method you should use.
1. When Your Data Source Can Export to Object Storage
If your source can write data into:
- AWS S3
- Google Cloud Storage (GCS)
- Azure Blob Storage
Then migration becomes extremely simple.
Use table functions (s3, gcs, azureBlobStorage)
These allow you to bulk-load structured files directly into ClickHouse Cloud.
This is ideal when:
- Your system already writes data into S3/GCS
- You export from a warehouse into Parquet
- You want a fast, cost-efficient bulk ingest path
This method is widely used and officially supported.
2. When Your Data Source Is a Database (MySQL, PostgreSQL, MongoDB, etc.)
If your data doesn’t already live in object storage, you have two clean, reliable ways to move it into ClickHouse:
A. Use clickhouse-local as your ETL host
- Reads directly from the source DB
- Writes directly into ClickHouse Cloud
- Zero CSVs, zero temporary files, no staging layer needed
B. Use JDBC/ODBC bridge integrations
For systems already using connectors, these work smoothly.
Optional Two-Step Method
If preferred:
- Export data from the source into S3/GCS
- Use table functions to load into ClickHouse
All three methods are officially aligned and reliable at scale.
3. When Your Data Source Is a Data Warehouse
Different warehouses require different approaches.
BigQuery
- Export → GCS
- Load using gcs table function
- Supports bulk loads + incremental updates/CDC
Snowflake
- Export to object storage
- Load into ClickHouse
- Snowflake doesn’t prescribe a single method — this is the standard approach
Amazon Redshift
Three common migration options:
- UNLOAD → S3 → ClickHouse
- Push from Redshift
- Pull from ClickHouse
All three approaches are documented and valid.
4. When Direct Integration Isn’t Available
When your source system doesn’t have a native connector, use a generic ETL/ELT tool:
- Airbyte
- dbt (for transformations)
- clickhouse-local (for ingestion)
Pipeline flow:
Source → ETL Tool → Object Storage / clickhouse-local → ClickHouse Cloud
This works reliably for less-common data sources.
Real-Time, Streaming, and CDC-Based Migrations
When you need fresh data — inserts, updates, and deletes moving into ClickHouse with minimal delay, real-time pipelines are the pattern to follow.
- Change Data Capture (CDC) tools
- Third-party ingestion systems
- Streaming pipelines
ClickHouse handles all major ingestion modes:
- Bulk ingestion
- Periodic updates
- Real-time replication (as demonstrated with BigQuery documentation)
If your workload needs freshness, this is the right pattern.
Schema, Networking, and Security Requirements
Regardless of the migration method you choose, you must:
Align schemas
Column names and data types must match between the source and destination.
Ensure network access
ClickHouse Cloud must allow your source IPs.
Use IP Access List to whitelist them.
Choose optimized formats
If using object storage, prefer:
- Parquet
- Avro
Both formats accelerate bulk ingestion.
Practical Migration: MySQL → ClickHouse → dbt → Databrain
This section walks through the actual implementation. All steps are preserved exactly as provided.
Step 1: Inspect Data in MySQL Workbench
Before migrating anything, validate what you have. Run basic row-count checks and simple validation queries to confirm table completeness:
Table structures:
Understanding your schema upfront is critical, mismatched types cause the majority of migration failures.
accounts
- id BIGINT
- name VARCHAR
- created_at DATETIME
users
- id BIGINT
- account_id BIGINT
- email VARCHAR
- created_at DATETIME
subscriptions
- id BIGINT
- account_id BIGINT
- plan VARCHAR
- status VARCHAR
- started_at DATETIME
- ended_at DATETIME
usage_events
- id BIGINT
- account_id BIGINT
- event_type VARCHAR
- event_time DATETIME
- metadata JSON
No export needed. clickhouse-local ClickHouse-local can connect directly to MySQL.
Step 2: Install clickhouse-local
Install clickhouse-local depending on your operating system:
Windows/Linux:
macOS:
This gives you a lightweight, local ClickHouse runner capable of querying and ingesting data without deploying a full server.
Step 3: Create Destination Tables in ClickHouse Cloud
Create the destination tables in ClickHouse Cloud:
- accounts
- users
- subscriptions
- usage_events
Use the exact same schema as your MySQL source. The DDL must match types precisely. This avoids ingestion errors and type coercion issues during migration.
Step 4: Migrate Each Table Using clickhouse-local
clickhouse-local handles both ingestion and transfer:
- It reads from MySQL using the MySQL table function
- It writes into ClickHouse Cloud using remoteSecure()
Run the four migration commands exactly as provided for:
- accounts
- users
- subscriptions
- usage_events
This completes a direct MySQL → ClickHouse migration with:
- No CSV files
- No temporary storage
- No staging infrastructure
The cleanest possible pipeline.
Step 5: Set Up dbt-clickhouse
Install dbt with ClickHouse support:
Initialize your dbt project:
Finally, configure your profiles.yml exactly as specified to ensure dbt connects to ClickHouse Cloud without authentication issues.
Step 6: Declare dbt Sources
Define your raw tables in src.yml, mapping them directly to the ClickHouse tables you created earlier.
This step tells dbt where your ingested MySQL data now lives.
Step 7: Build dbt Models
Create your transformation models:
- fct_account_profile
Joins accounts & active subscription.
- fct_daily_usage
Incremental daily usage summary. SQL is preserved exactly.
Step 8: Run dbt
Execute your models:
This builds materialized models inside ClickHouse Cloud using the transformations defined earlier.
Step 9: Connect ClickHouse Cloud to Databrain
To visualize your transformed data, connect ClickHouse Cloud as a datasource in Databrain:
- Add New Datasource
- Choose ClickHouse Cloud
- Enter host, port, SSL, credentials
- Sync schema
Your dbt models now appear:
- fct_account_profile
- fct_daily_usage
This step walks through the quickest way to set up a dev ClickHouse cluster to Databrain. If you need the full connector setup (network access, SSL/TLS, permissions, and best practices for multi-tenant SaaS), check out our overview of the Databrain–ClickHouse integration.
Quick References:
Step 10: Analyze Data in Databrain and build Dashboards
Now that your models are live, you can explore your data inside Databrain and build dashboards.
Account Overview
- Active accounts
- Plan distribution
- Monthly account creation
- Subscription statuses

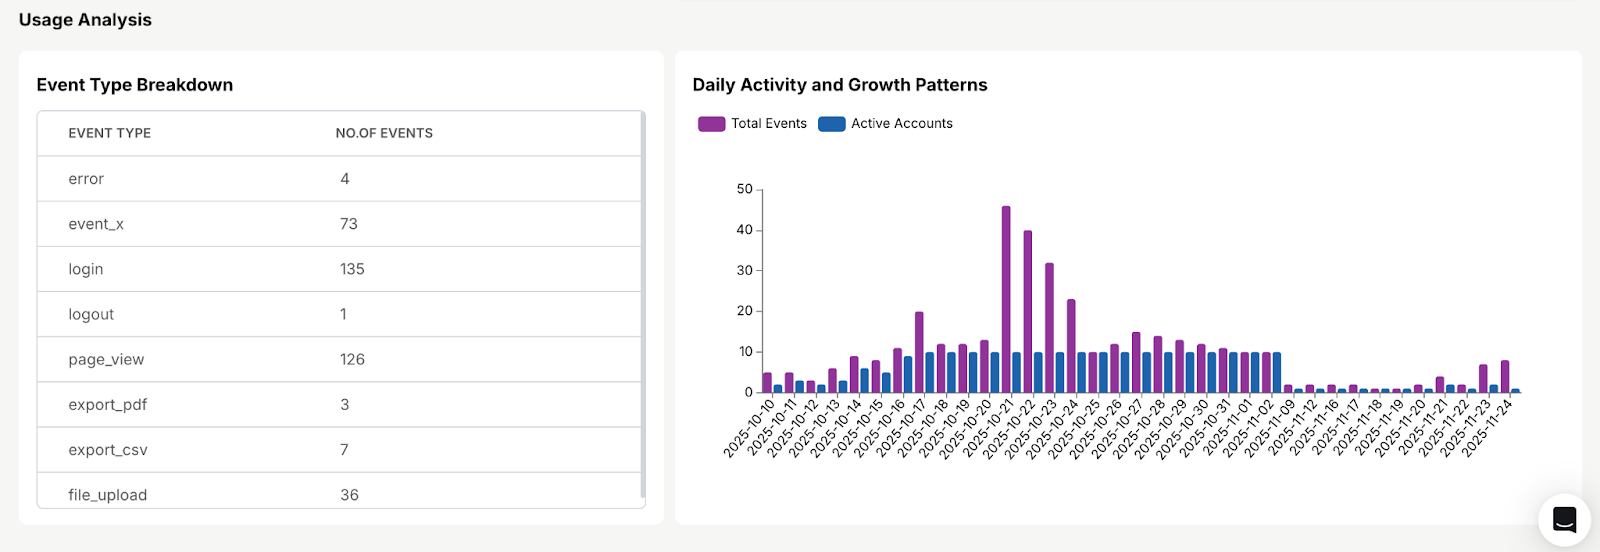
Usage Analysis
- Daily activity
- Most frequent event types
- Growth patterns
- Usage spikes/drops
Step 11: Embed Databrain Dashboard
Once your dashboards are built, you can embed them directly into your application using Databrain’s embedding framework.
Helpful resources:
- Embedding tutorial to seamlessly embed a Databrain dashboard into your application
- Book a Demo to see Databrain in action
- Explore Databrain Docs for detailed implementation guides
- Try Databrain with your own data
Production Data Lifecycle
Once everything is deployed, your system operates as a fully automated, real-time data pipeline. The flow looks like this:
- Your source database continues to update
- clickhouse-local pulls incremental changes
- dbt-clickhouse regenerates your models
- Databrain dashboards refresh automatically
- Embedded analytics inside your application update instantly
This forms a fully automated, real-time analytics pipeline.
Final Architecture
Your complete, end-to-end pipeline looks like this:
MySQL → clickhouse-local → ClickHouse Cloud → dbt → Databrain → Embedded Analytics
Clean. Fast. Scalable. Production-ready.
This is the foundation for a long-term, future-proof analytics stack.
Frequently Asked Questions
What is ClickHouse used for?
ClickHouse is a high-performance columnar database built for analytics, real-time dashboards, event data, and large-scale reporting. It can process billions of rows per second with sub-second latency.
What is the best way to migrate data into ClickHouse?
The most common migration paths include exporting data to Parquet, using Kafka or streaming connectors, loading batch files via clickhouse-client, or using ETL/ELT tools like Airbyte, Fivetran, Debezium, or dbt. The best method depends on the size, format, and update frequency of your data.
How do I ensure schema consistency when migrating to ClickHouse?
Best practices include: matching data types from source to destination, pre-creating tables, validating using DESCRIBE TABLE, and testing ingestion on small samples first.


